I recently moved into a new apartment which I used as an opportunity to make our home a little smarter.
As a big open source supporter I built my smart home platform with Home Assistant of course.
Unfortunately, there are still far too few products that are directly compatible with Home Assistant.
Especially in the area of humidifiers where I only found products that rely on a proprietary app or cloud from the manufacturer.
Something that I would like to avoid at all costs.
For one thing, such dependence is a certain form of planned obsolescence, as the product becomes useless as soon as the app loses its compatibility with new smartphone operating system versions or the manufacturer’s cloud is no longer operated.
Therefore, it was important for me to find a smart humidifier that integrates directly with my Home Assistant setup.
To achieve this goal, I identified two options:
Add sensors / actuators to a classic humidifier to make it smart.
Replace the firmware of a smart humidifier with my own source code.
I decided to use the second approach, because it required less effort, since I would have had to implement my own firmware anyway.
My blog noteblok.net has joined the Fediverse.
You can follow my posts via this new handle: stv0g@noteblok.net.
This has been made possible by the Wordpress ActivityPub Plugin.
With the ActivityPub plugin installed, the WordPress blog functions as a federated profile, along with profiles for each author.
For example, my blog-wide profile can be found at @blog@noteblok.net.
Authors like myself, on the other hand, would have their individual profiles at @stv0g@noteblok.net.
The integration allows following the blog from your own Fediverse platform and account like Mastodon.
I return you can also react and comment to my blog posts via simply replying with your existing Fediverse account.
Just like the venerable Dnsmasq AVM’s FRITZ!OS uses hostnames learned from its DHCP leases and makes them resolvable via its internal DNS server.
Unfortunately, this feature in FRITZ!OS has some limitations:
The name of the DNS Zone is hard coded to fritz.box and can not be adjusted. Hence, the resolvable names have the following schema: myhostname.fritz.box
The internal DNS server only supports recursive DNS looks. It does not act as an authoritative DNS server. Hence the local zone can not be delegated.
AXFR zone transfers are not supported.
My solution to these shortcomings is Fritz-DNS which:
Is a small tool written in the Go programming language.
Is a small authoritative DNS server which serves A / AAAA resource records for local hosts connected to an AVM Fritz Box home WiFi router.
Can be used in a hidden master configuration as it supports AXFR zone transfers.
Uses the custom extension (X_AVM-DE_GetHostListPath) of the TR-064 Hosts SOAP-API as documented here to retrieve a list of local hosts.
Supports the generation of AAAA (IPv6) resource records based on the hosts MAC addresses using 64-Bit Extended Unique Identifier (EUI-64) and a configured unique local address (ULA) prefix.
Does not yet support PTR resource records (to be implemented…)
WireGuard is a communication protocol and free and open-source software that implements encrypted virtual private networks (VPNs), and was designed with the goals of ease of use, high speed performance, and low attack surface.
I’ve been using it in my home lab setup since about 2020.
When, in the end of 2021, it was finally merged into the Linux mainline with release 5.9, I started to replace my former Tinc-VPN setup with it.
Tinc-VPN is another great open source VPN solution.
Unfortunately, its development has stalled over the last years which motivated me to look for alternatives.
In contrast to WireGuard, Tinc runs as a user-space daemon and uses tun / tap devices which adds a significant processing overhead.
Like WireGuard, it is also using UDP for tunneling data, but falls back to TCP in situations where direct datagram connectivity is not feasible.
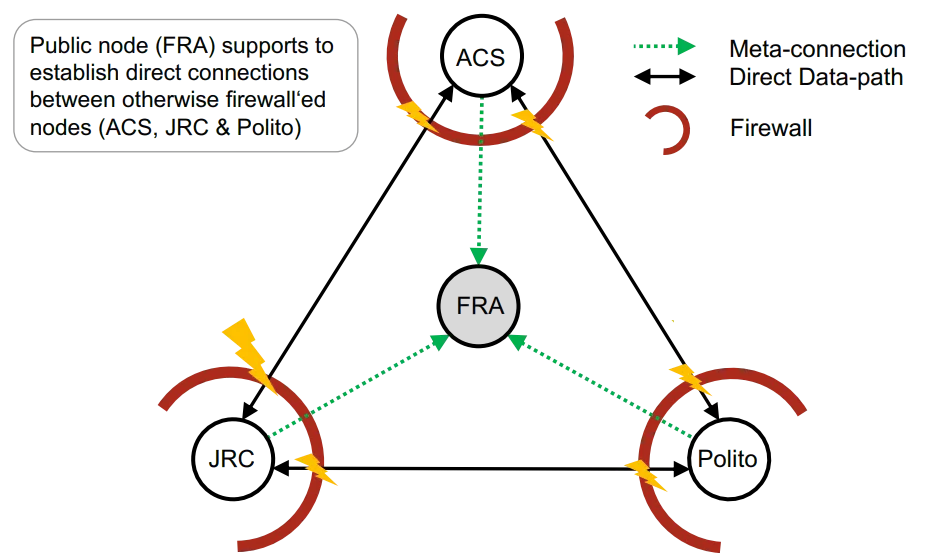
Another big advantage of Tinc is its ability to form a mesh of nodes and to route traffic within it when direct P2P connections are not possible due to firewall restrictions.
At the same time, this mesh is also used for facilitating direct connections by signaling endpoint addresses of NATed hosts.
Tinc's mesh capability.
This mesh functionality made Tinc quite robust against the failure of single nodes as usually we could route traffic via other paths.
That said, it is worth noting that this setup does will not bring back some of the beloved features of Tinc.
Both meshing, the peer and and endpoint discovery features of Tinc are currently and will never be supported by WireGuard.
Jason A. Donenfeld the author of WireGuard focused the design of WireGuard on simplicity, performance and auditability.
Hence advanced features like the ones mentioned will only be available to WireGuard by additional agents / daemons which control and configure WireGuard for you.
Examples for such are Tailscale, Netmaker and Netbird.
The setup presented in this post is a so called active / standby configuration consisting of two almost equal configured Linux servers running both WireGuard and the keepalived daemon.
As the name suggest only one of those two servers will by actively handling WireGuard tunneling traffic while the other one stands by for the event of a failure or maintenance of the active node.
Before get started some requirements for the setup:
2 Servers running Linux 5.9 or newer.
A working Wireguard configuration.
A local L2 network segment two which both servers are connected.
Upstream connectivity without NATing via gateway connected to the network segment (usually provided by your internet or hosting provider).
An unused address to be used as Virtual IP (VIP) which roamed between the two servers by VRRP.
An important point is here the assumption that we are running both servers in the same switched network segment as this is a requirement for VRRP.
We are also assuming that the upstream gateway performs no NATing.
This guide covers only IPv6 addressing.
However all steps can be also adapted or repeated for a dual stack or IPv4-only setup.
Similarly, a reciprocal configuration file is needed on the client side which skip here for brevity.
Before proceeding, we activate the interface on both servers:
Terminal window
systemctlenable--nowwg-quick@wg1
wgshowwg1# Check if interface is up
Configuring Keepalived
Create a configuration file for keepalived at /etc/keepalived/keepalived.conf
global_defs {
enable_script_security
script_user root
}
# Check if the server the WireGuard interface configured
vrrp_script check_wg {
script "/usr/bin/wg show wg1"
user root
}
vrrp_instance wg_v6 {
interface eno1
virtual_router_id 52
notify /usr/local/bin/keepalived-wg.sh
state BACKUP # use BACKUP for Server B
priority 99 # use 100 for Server B
virtual_ipaddress {
2001:DB8:1::1/64
}
track_script {
check_wg
}
}
Create a notification script for keepalived at /usr/local/bin/keepalived-wg.sh
#!/usr/bin/env bash
TYPE=$1
NAME=$2
STATE=$3
PRIO=$4
WGIF=wg1
case${STATE}in
MASTER)
iplinksetupdev${WGIF}
;;
BACKUP|FAULT|STOP|DELETED)
iplinksetdowndev${WGIF}
;;
*)
echo"unknown state"
exit1
esac
Now start the keepalived daemon:
Terminal window
chmod+x/usr/local/bin/keepalived-wg.sh
systemctlenable--nowkeepalived
Testing the fail over
In our configuration, Server A has a higher VRRP priority and as such will be preferred if both servers are healthy.
To test our setup, we simply bring down the WireGuard interface on Server A and observe how the VIP gets moved to Server B.
From the WireGuard peers perspective not much changes.
In fact no connections will be dropped during the fail-over.
Internally, the clients WireGuard interface renegotiate the handshake.
However, that step is actually not observable by the user.
Run the following commands on Server A while alongside test the connectivity from the client side through the tunnel via ping -i0.2 2001:DB8:2::1:
Terminal window
# Check that keepalived has moved the VIP to interface eno1
ipaddrshowdeveno1
# Bring down the Wireguard interface
wg-quickdownwg1
# Keepalived should now have moved the VIP to Server B
In my personal network, I operate a Interior Gateway Protocol (IGP) to dynamically route traffic within and also towards other networks.
Common IGPs are OSPF, ISIS or BGP.
In my specific case, both Servers A & B run the Bird2 routing daemon with interior and exterior BGP sessions.
So how does the WireGuard HA setup interoperates with my interior routing? Quite well actually.
As my notify script (keepalive-wg.sh) will automatically bring up / down the interface, the routes attached to the interface will be picked up by Bird’s direct protocol.
I am also planning to extend my WireGuard agent cunīcu (/cunicu/cunicu ) to support the synchronization of WireGuard interface configurations between multiple servers.
Surprisingly, the setup works by using Keepalived and does not require any iptables or nftables magic to rewrite source IP addresses.
I’ve seen some people mentioning that SNAT / DNAT would be required to convince WireGuard to use the virtual IP instead of the server addresses.
However, in my experience this was not necessary.
Another concern has been that the backup Wireguard interface still might attempt to establish a handshake with its peers.
This would quite certainly interfere with the handshakes originated by the current master server.
However, also this has not been proven to be the case.
I assume the fact that our notify script brings down the WireGuard interface on the backup server causes them to cease all communication with its peers.
In my previous post, I demonstrated how to gain root access by enabling a Telnet daemon via the routers AT-over-TCP interface.
In this post I will close this gasping security hole by replacing the Telnet with a Secure Shell (SSH) daemon.
Netgear’s firmware does not ship with a SSH daemon itself.
So we first build a statically linked Dropbear instead of the rather heavy OpenSSH daemon.
This post is documenting some internals of the device which is not the most exciting stuff to read.
I mainly collected it here for documentation purposes.
All information in this post has been collected from a device running firmware version NTGX55_12.04.12.00.
My inspiration: the wall-mount and antenna adapter from FTS Hennig.
Unfortunately, the mount is with a price tag of around 50 € rather expensive.
So I decided to use our new lab 3D-printer and try do design it myself usings AutoDesk’s Fusion 360 software.
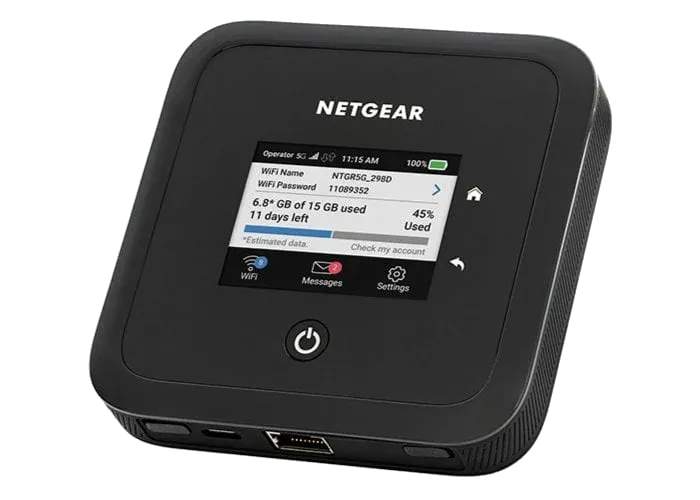
This blog posts covers the required steps to gain root access via Telnet on Netgear Nighthawk Mobile 5G/LTE Routers. Its the first post in a small series covering my experiences playing around with this device.
Last month I obtained one of Netgear’s latest mobile 5G routers, the Netgear Nighthawk M5 (model MR5200-100EUS) . Being one of the most expensive consumer 5G routers, I was lucky to get a fairly good second hand deal from eBay.
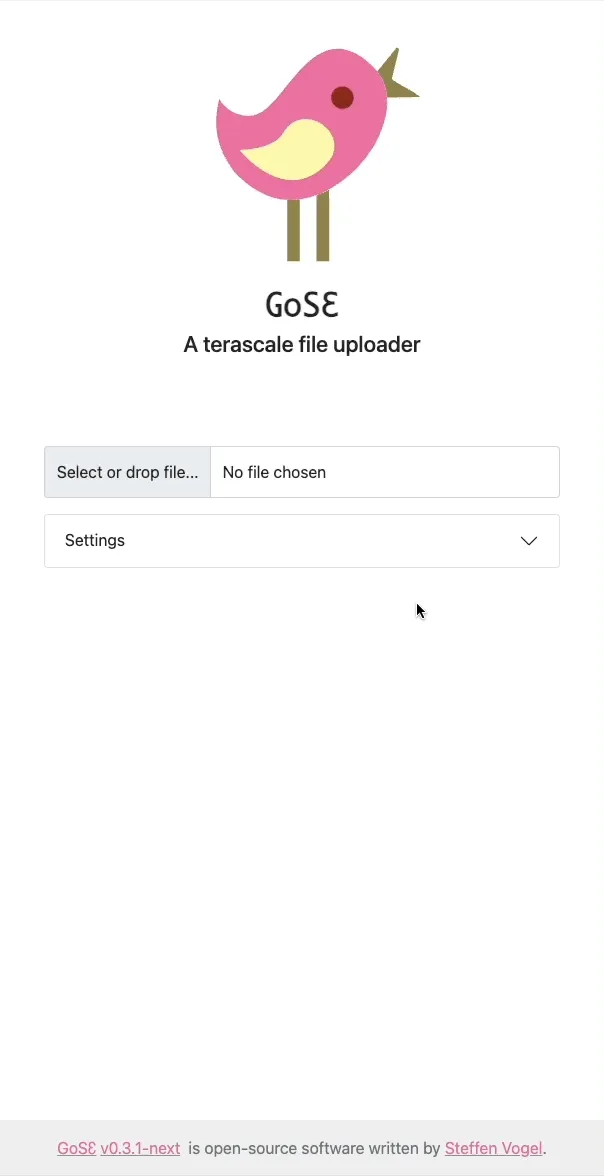
GoSƐ is a modern and scalable file-uploader focusing on scalability and simplicity.
It is a little hobby project I’ve been working on over the last weekends.
The only requirement for GoSƐ is a S3 storage backend which allows to it to scale horizontally without the need for additional databases or caches.
Uploaded files a divided into equally sized chunks which are hashed with a MD5 digest in the browser for upload.
This allows GoSƐ to skip chunks which already exist.
Seamless resumption of interrupted uploads and storage savings are the consequence.
And either way both upload and downloads are always directed directly at the S3 server so GoSƐ only sees a few small HTTP requests instead of the bulk of the data.
Behind the scenes, GoSƐ uses many of the more advanced S3 features like Multi-part Uploads and Pre-signed Requests to make this happen.
Users have a few options to select between multiple pre-configured S3 buckets or enable browser & mail notifications about completed uploads.
A customizable retention / expiration time for each upload is also selectable by the user and implemented by S3 life-cycle policies.
Optionally, users can also opt-in to use an external service to shorten the URL of the uploaded file.
Currently a single concurrent upload of a single file is supported.
Users can observe the progress via a table of details statistics, a progress-bar and a chart showing the current transfer speed.
GoSƐ aims at keeping its deployment simple and by bundling both front- & backend components in a single binary or Docker image.
GoSƐ has been tested with AWS S3, Ceph’s RadosGW and Minio.
Pre-built binaries and Docker images of GoSƐ are available for all major operating systems and architectures at the release page: /stv0g/gose (Releases) .
GoSƐ is open-source software licensed under the Apache 2.0 license.
I consider the current state of GoSƐ to be production ready.
Its basic functionality is complete.
However, there are still some ideas which I would like to work on in the future:
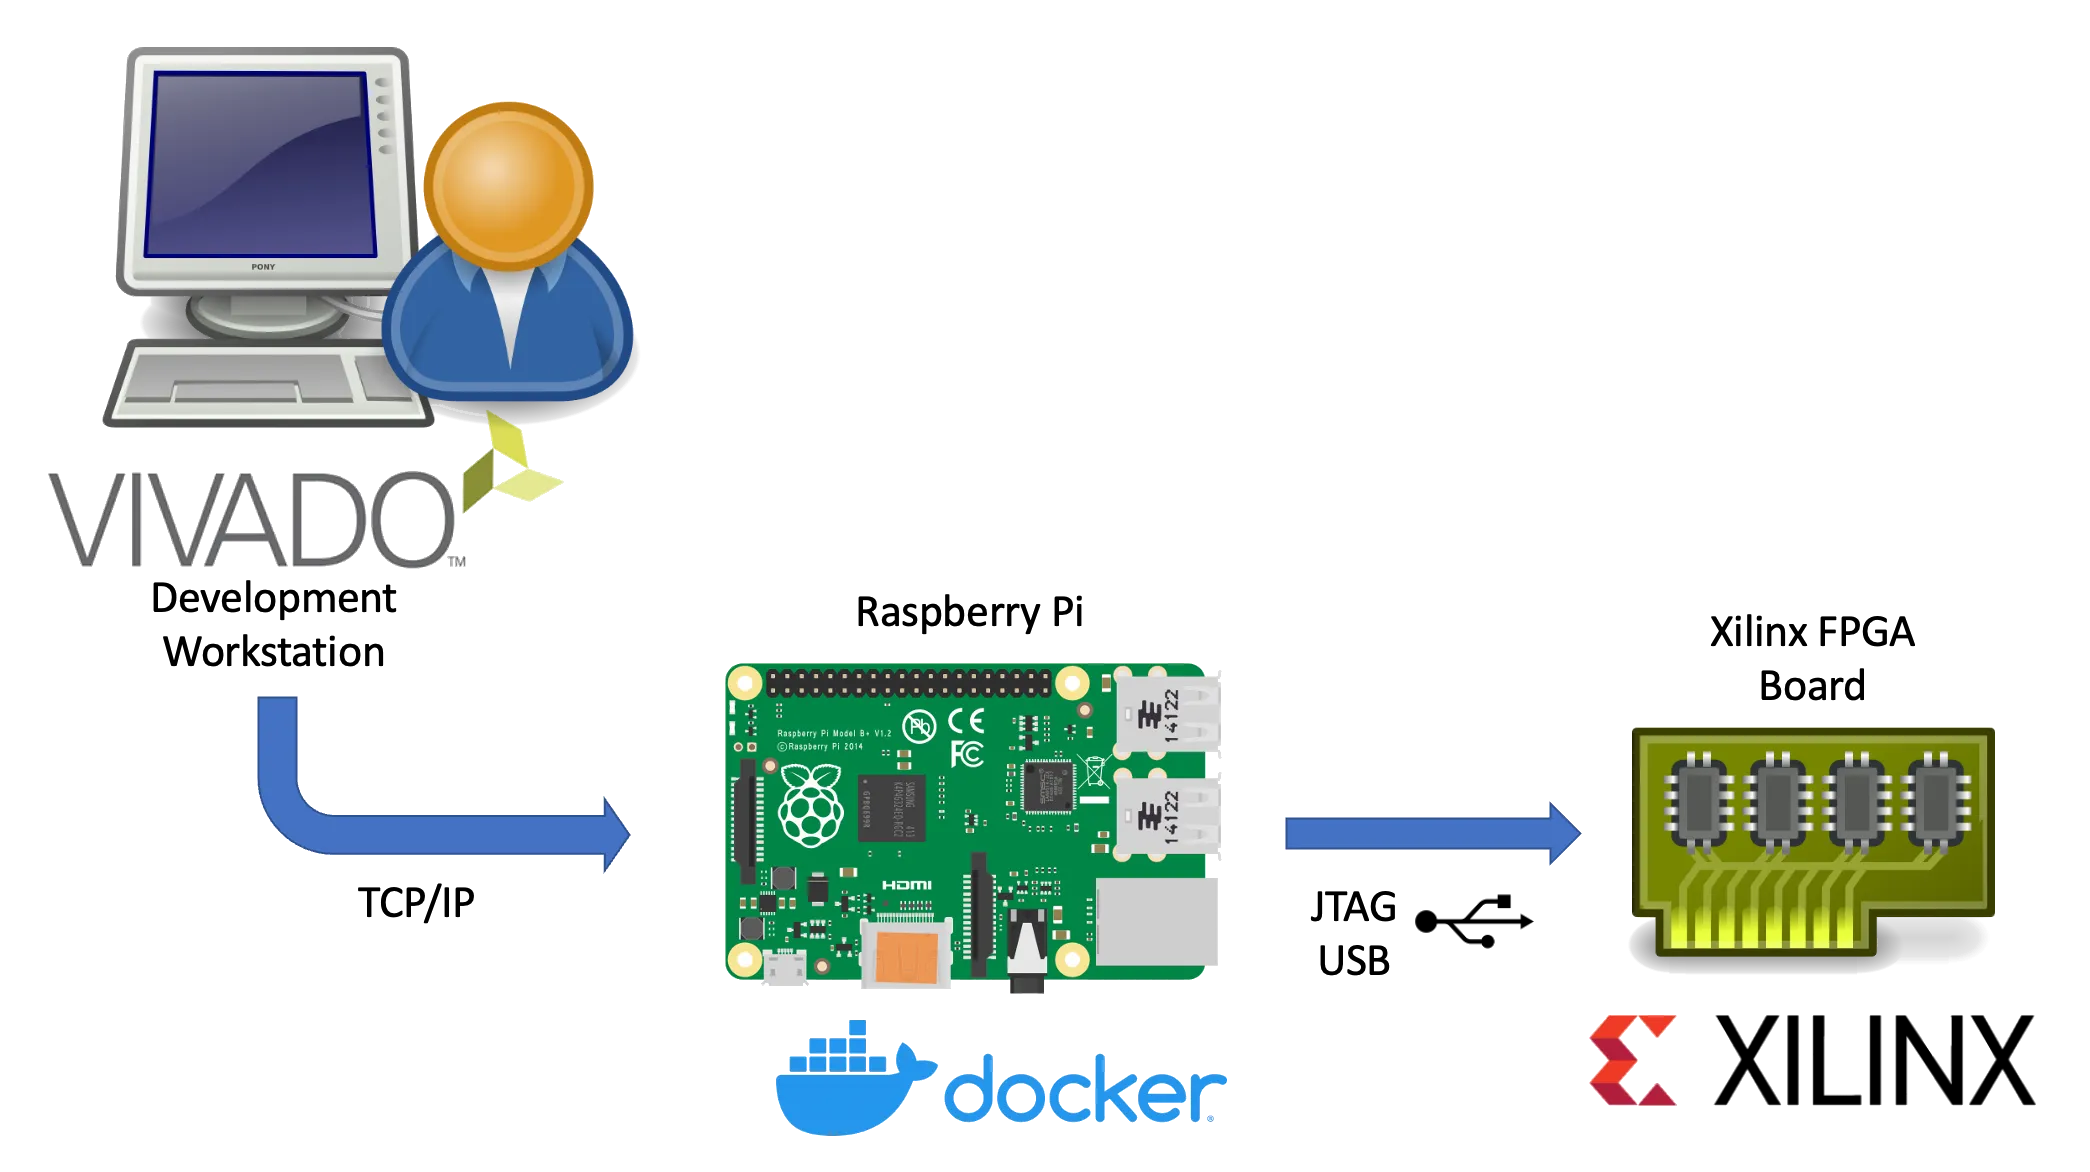
This article describes the necessary steps to run a Xilinx hw_server as a Docker container.
Xilinx’s hw_server is a command line utility which handles JTAG communication between a Xilinx FPGA board and usually the Vivado IDE.
It can be used to configure the FPGA bitstream, connect to the embedded logic analyzer cores (ILA) or perform debugging of processor cores via GDB and the Xilinx System Debugger (XSDB).
The hw_server is usually used when those tasks shall performed remotely as the connection between Vivado or XSDB is established via TCP connection and allows us to run it on a remote system.
Running the hw_server as a Docker container has the benefit that its installation is simplified to starting a Docker container by running:
Terminal window
dockerrun\
--restartunless-stopped\
--privileged\
--volume/dev/bus/usb:/dev/bus/usb\
--publish3121:3121\
--detach\
ghcr.io/stv0g/hw_server:v2021.2
It also allows us to run the hw_server on architectures which are not natively supported by Xilinx such as the commonly used Aarch / ARM64 and ARMv7 architectures found in Raspberry Pis.
This is enabled by Dockers support for running container images for non-native architectures.
I am using the aptman/qus Docker image (/dbhi/qus ) to setup this user-mode emulation.
The qemu-user-static (qus) image is a compilation of utilities, examples and references to build and execute OCI images (aka docker images) for foreign architectures using QEMU’s user-mode emulation.
Run the following commands to run the hw_server on a embedded device:
Terminal window
# Install docker
sudoapt-getupdate&&sudoapt-getupgrade
curl-sSLhttps://get.docker.com|sh
# Start Docker
sudosystemctlenable--nowdocker
# Enable qemu-user emulation support for running amd64 Docker images
# *Note:* only required if your system arch is not amd64!
In this quick post I will show you how to use the password manager “password-store”1 to securely store your credentials used by the Amazon Webservices command line client.
AWS CLI Logo.
The installation for Mac and Linux system is fairly easy:
Terminal window
pipinstallawscli
The credentials are stored as key-value pairs inside a PGP-encrypted file.
Every time you call the AWS CLI tool, your keys will be decrypted and directly passed to the aws tool.
Use pass to add your keys in the store:
Terminal window
passeditproviders/aws
An editor opens.
Use the following format:
User: stv0g
Access-Key: AKB3ASJGBS3GOMXK6KPSQ
Secret-Key: vAAABn/PMAksd235gAs/FSshhr42dg2D4EY3
Add the following snippet to your ~/.bashrc:
Terminal window
functionaws{
localPASS=$(passproviders/aws)
localAWS=$(whichaws)
# Start original aws executable with short-lived keys
I spent some time over the last months to improve the security of servers and passwords.
In doing so, I started to orchestrate my servers using a configuration management tool called Ansible.
This allows me to spin-up fresh servers in a few seconds and to get rid of year-old, polluted and insecure system images.
Ansible loves Yubico.
My ‘single password for everything’ has been replaced by a new password policy which enforces individual passwords for every single service.
This was easier than I previously expected:
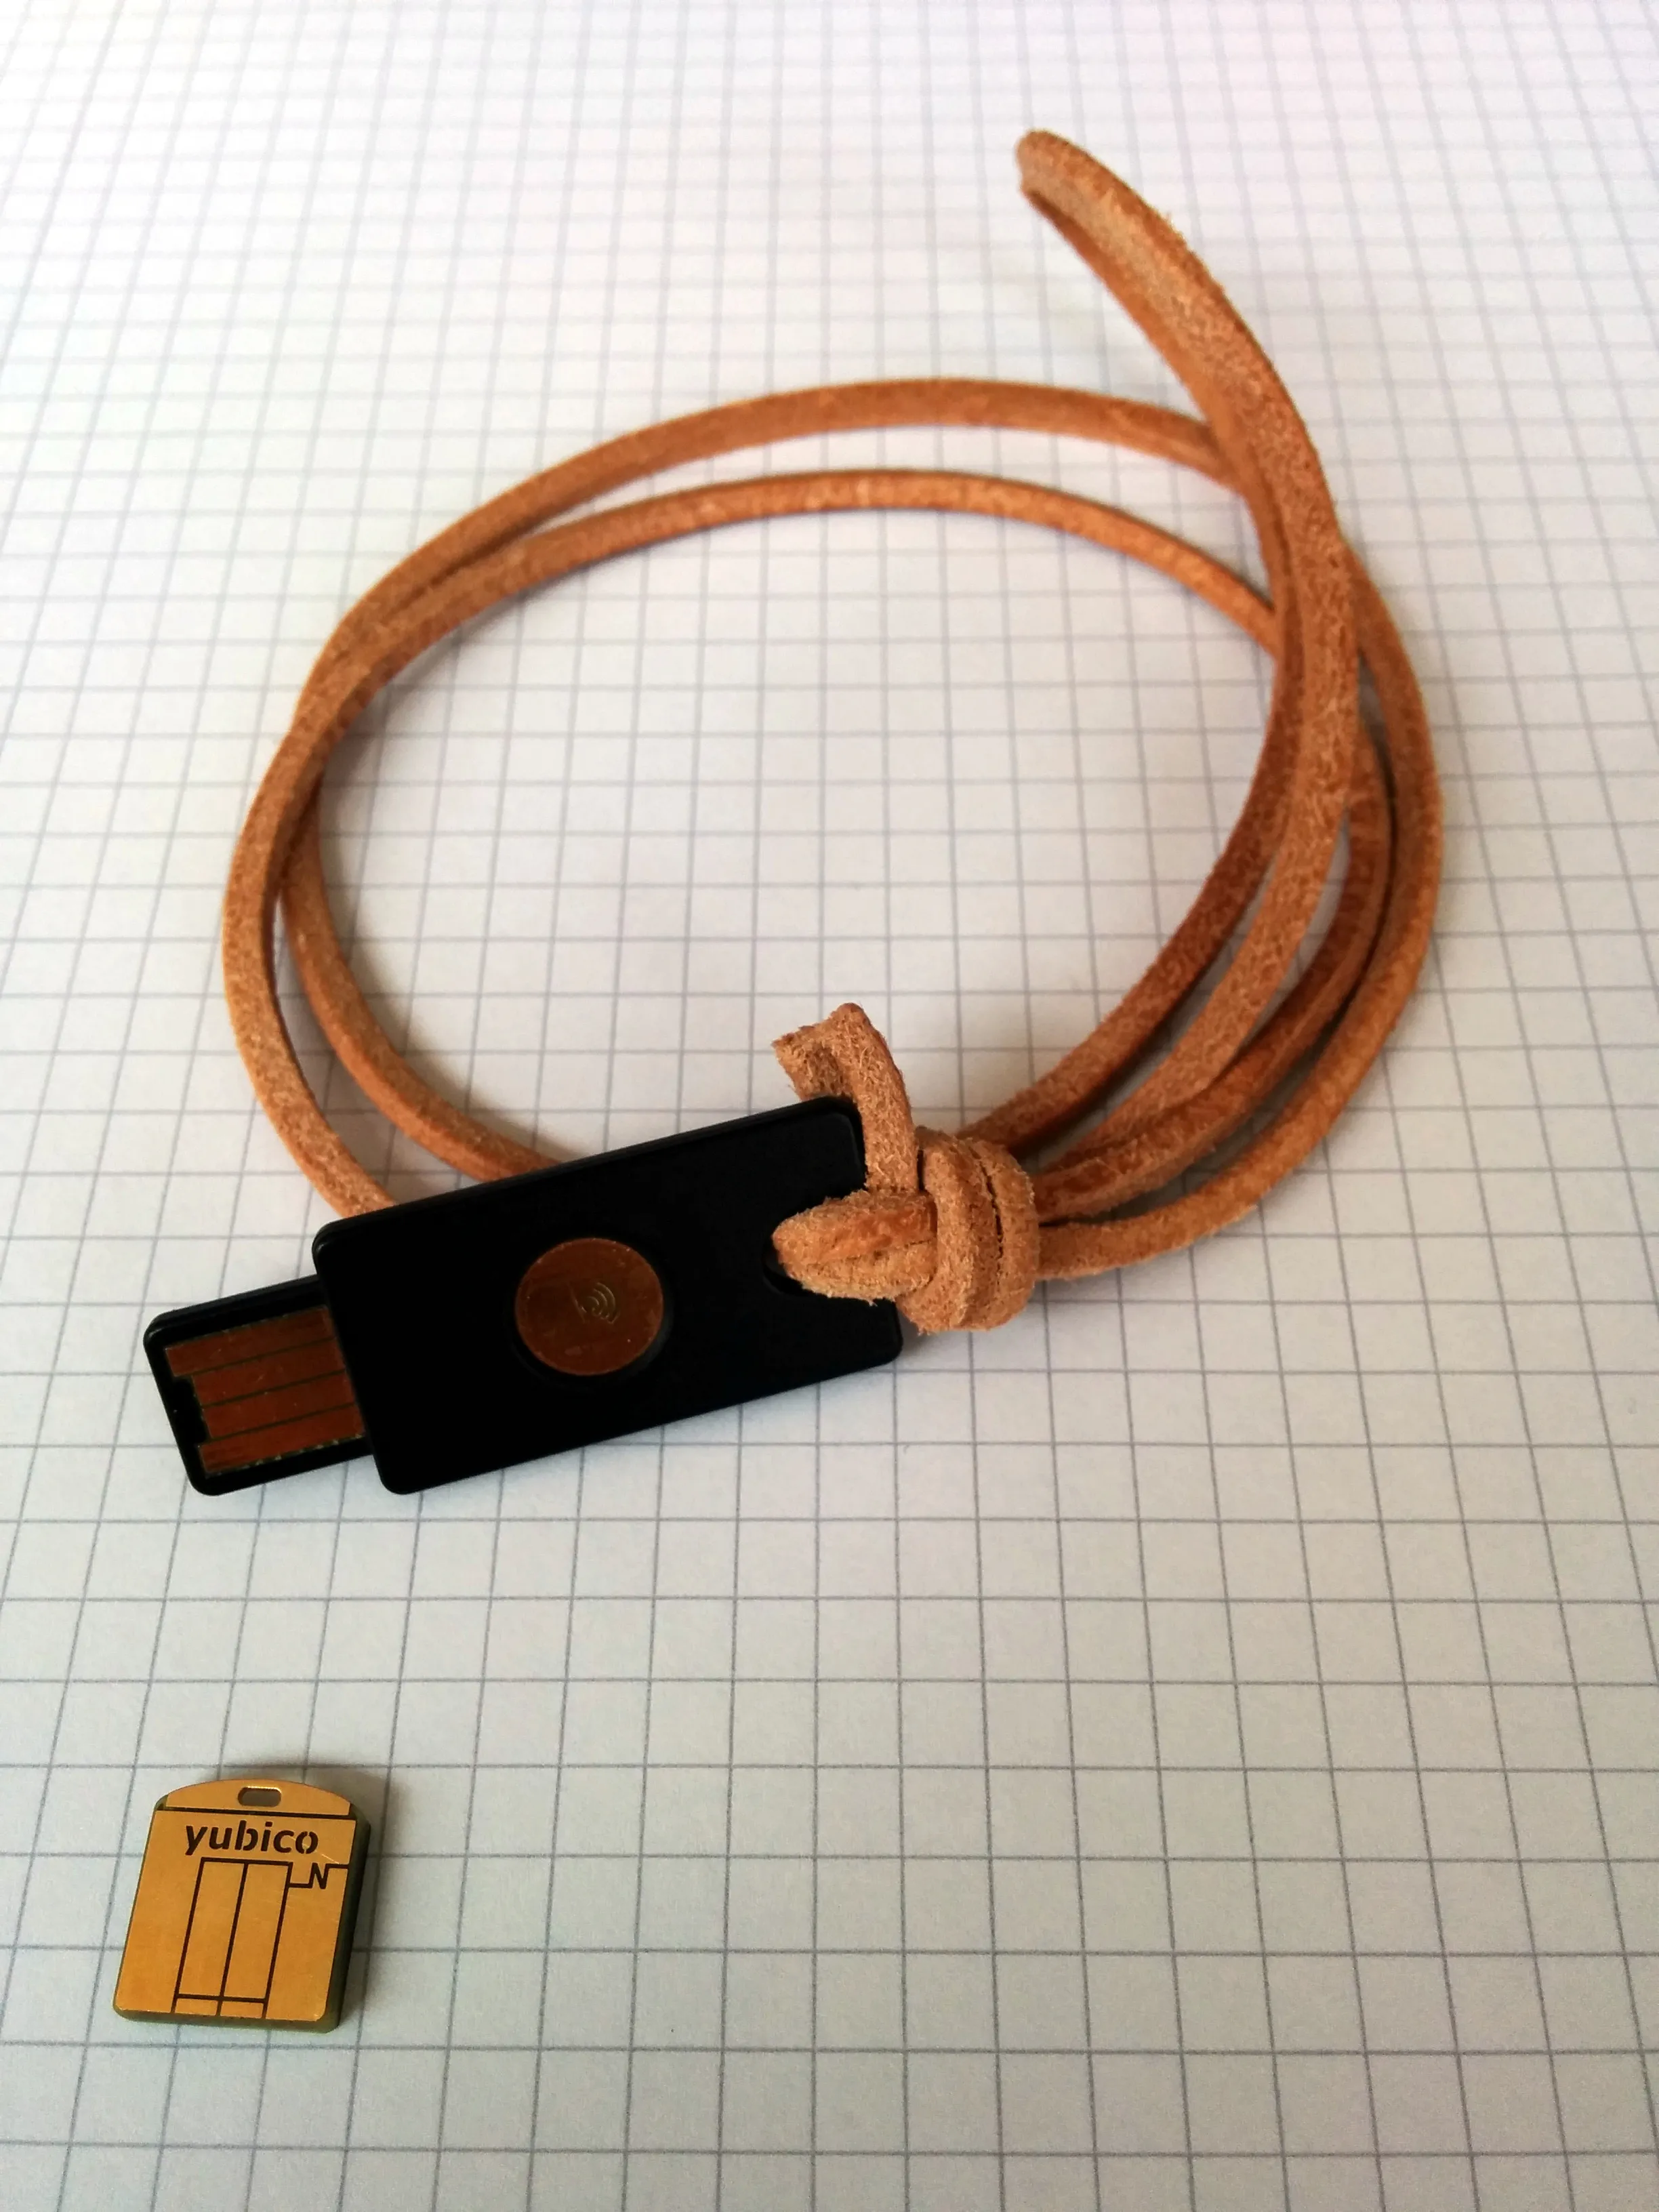
To unlock the ‘paranoid’ level, I additionally purchased a Yubikey Neo token to handle the decryption of my login credentials in tamper-proof hardware.
‘pass’ is just a small shell script to glue several existing Unix tools together: Bash, pwgen, Git, xclip & GnuPG (obeying the Unix philosophy).
The passwords are stored in simple text files which are encrypted by PGP and stored in a directory structure which is managed in a Git repository.
Yubikey Neo und Neo-n.
There are already a tons of tutorials which present the tools I describes above.
I do not want to repeat all of it.
So, this post is dedicated to solve some smaller issues I encountered.
I wrote a C++ header file to facilitate the co-operation of those two libraries.
This file enables the conversion / casting of OpenCV and Qt types e.g.:
The lectures during my last semester were largely focused on digital image processing.
Combining this with the inspiration for 3D printing, I gathered through my trip though South Korea, resulted in the following seminar paper.
Seminars are a compulsory part of our curriculum which I like due the self-contained work and the ability to pick an individual topic.
Over the past year, I’ve built my own Kossel 3D printer.
The Mini Kossel is based on a novel parallel delta kinematic which was developed by Johann C. Rocholl, a Google engineer from Germany.
This paper is targeting the automation of solder paste dispensing onto printed circuit boards by using computer vision and RepRap robots.
Almost fourteen months ago, I started working on my bachelor thesis.
Although I finished it half a year ago, it’s still part of my work as a student research assistant.
During my initial work, most of the code was written for an internal research kernel.
I’m now happy that we were able to port it to an open source kernel called eduOS: /RWTH-OS/eduOS ).
This minimal operating system is used for practical demo’s and assignments during the OS course at my university.
There’s much more I could write about.
So this will probably be another separate blog post.
The motive for this article is an abstract I wrote for the student research competition of the ASPLOS conference which is held this year in Istanbul, Turkey.
Unfortunately my submission got rejected.
But as a nice side-effect, I’ve now the chance to present my work to an English audience as well:
This is my first English blog post.
Excuse me for my hopefully not so bad English 😊.
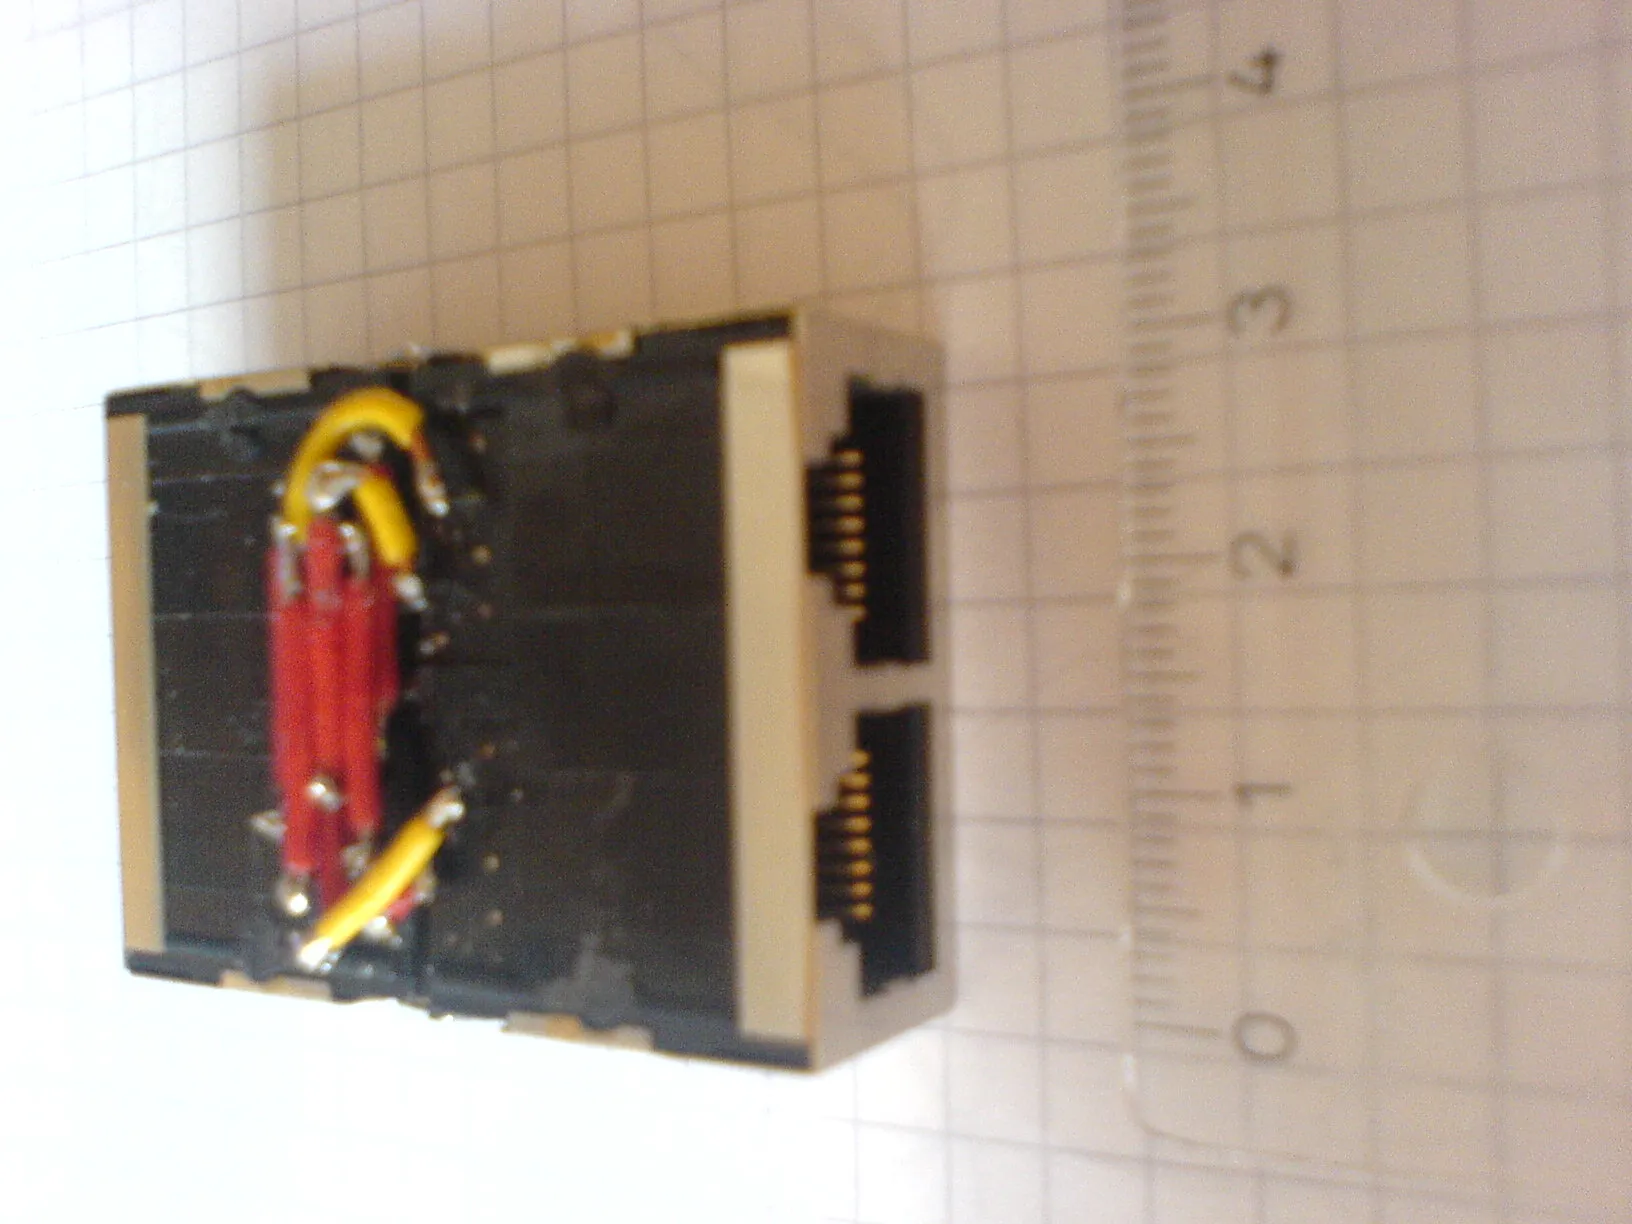
During my reverse engineering on the Terratec Noxon 2 Audio I had to sniff the network traffic between the Noxon and the Internet.
First, I just sniffed the wireless traffic with a simple ARP spoofing attack in my switched network.
But I couldn’t be sure whether I sniffed the whole traffic or if I just missed some internal traffic in my network.
After some internet research, I decided to build my own passive Ethernet tap to do a MITM (man-in-the-middle) attack.
In 13/1 wird im Englisch Grundkurs Australien als Themenschwerpunkt vorgeschrieben.
Jedem unseres Englischkurses wurde in Kleingruppen ein australischer Staat beziehungsweise “Territory” zugeteilt, den er Präsentieren sollte.
Wir (Jonas und ich) entschieden uns für Victoria.
Jonas hatte durch Verwandte in dieser Gegend ein paar Bilder und Informationen besorgen können.
Außerdem setzten wir einen Schwerpunkt auf Melbourne mit seiner Kultur und Infrastruktur.